准备工作
上传 elasticsearch-7.9.3-linux-x86_64.tar 解压
1
| tar -zvxf elasticsearch-7.9.3-linux-x86_64.tar.gz
|
拷贝到 /usr/local/es 目录下
1
| cp -r /usr/ftp/elasticsearch-7.9.3 /usr/local/es
|
安装配置
修改配置
1
| vi /usr/local/es/elasticsearch-7.9.3/config/elasticsearch.yml
|
1
2
3
4
5
6
7
8
| cluster.name: my-ess #修改集群名称
node.name: es-1 #修改节点名称
path.data: /usr/local/es/elasticsearch-7.9.3/data #数据存储路径
path.logs: /usr/local/es/elasticsearch-7.9.3/logs #日志存储路径
network.host: 0.0.0.0 #允许任意主机访问
http.port: 9200 #web访问端口
discovery.seed_hosts: ["es-1"] #发现的主机
cluster.initial_master_nodes: ["es-1"] #初始化主节点
|
es为了安全考虑不允许使用root账号 或者root身份登录 所以需单独创建账号
修改es文件目录的所有者为es
1
2
| chown -R es:es /usr/local/es
su es
|
启动程序
1
| /usr/local/es/elasticsearch-7.9.3/bin/elasticsearch
|
需要选保证jdk正确安装 启动出现 低于最低大小配置

切回root用户 编辑 /etc/security/limits.conf,追加以下内容
1
2
3
4
| vi /etc/security/limits.conf
|
此文件修改后需要重新登录用户,才会生效
编辑 /etc/sysctl.conf,追加以下内容
1
2
3
| vi /etc/sysctl.conf
vm.max_map_count=655360
|
修改完成重启虚拟机 切换es用户启动
1
| /usr/local/es/elasticsearch-7.9.3/bin/elasticsearch -d
|

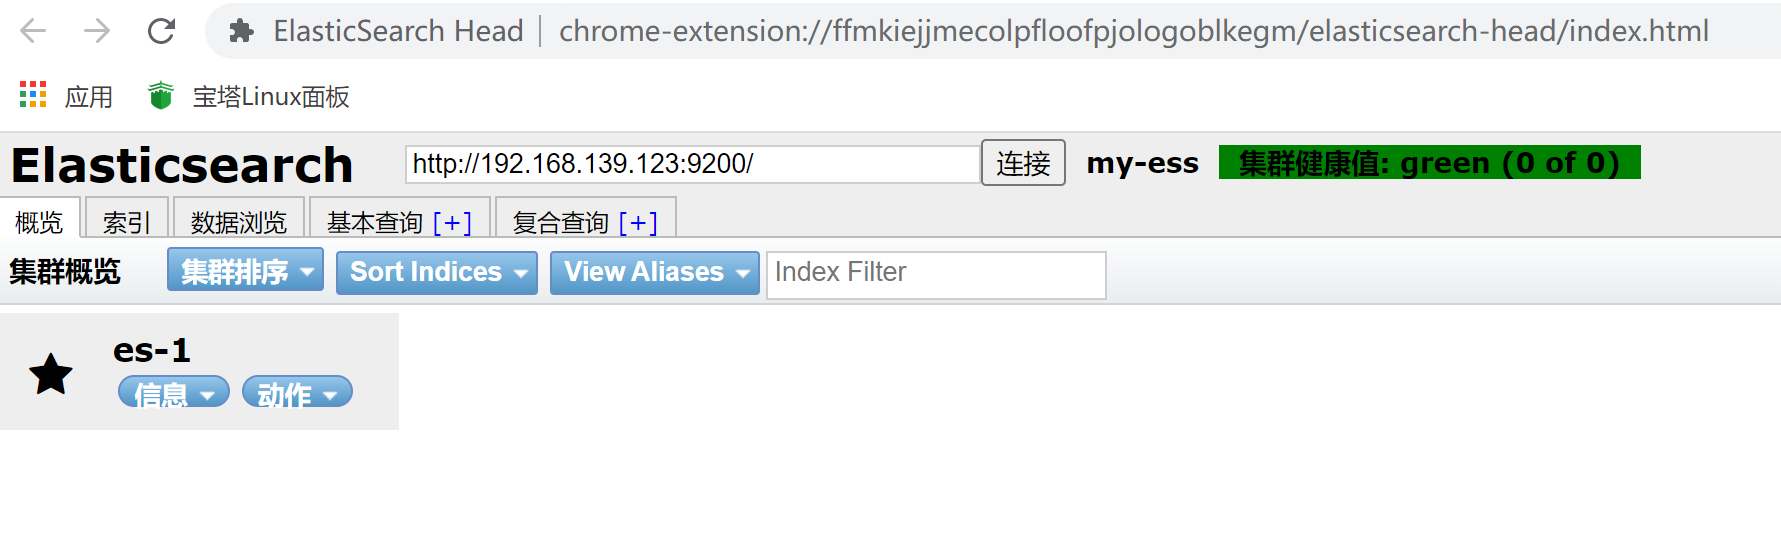
浏览器访问
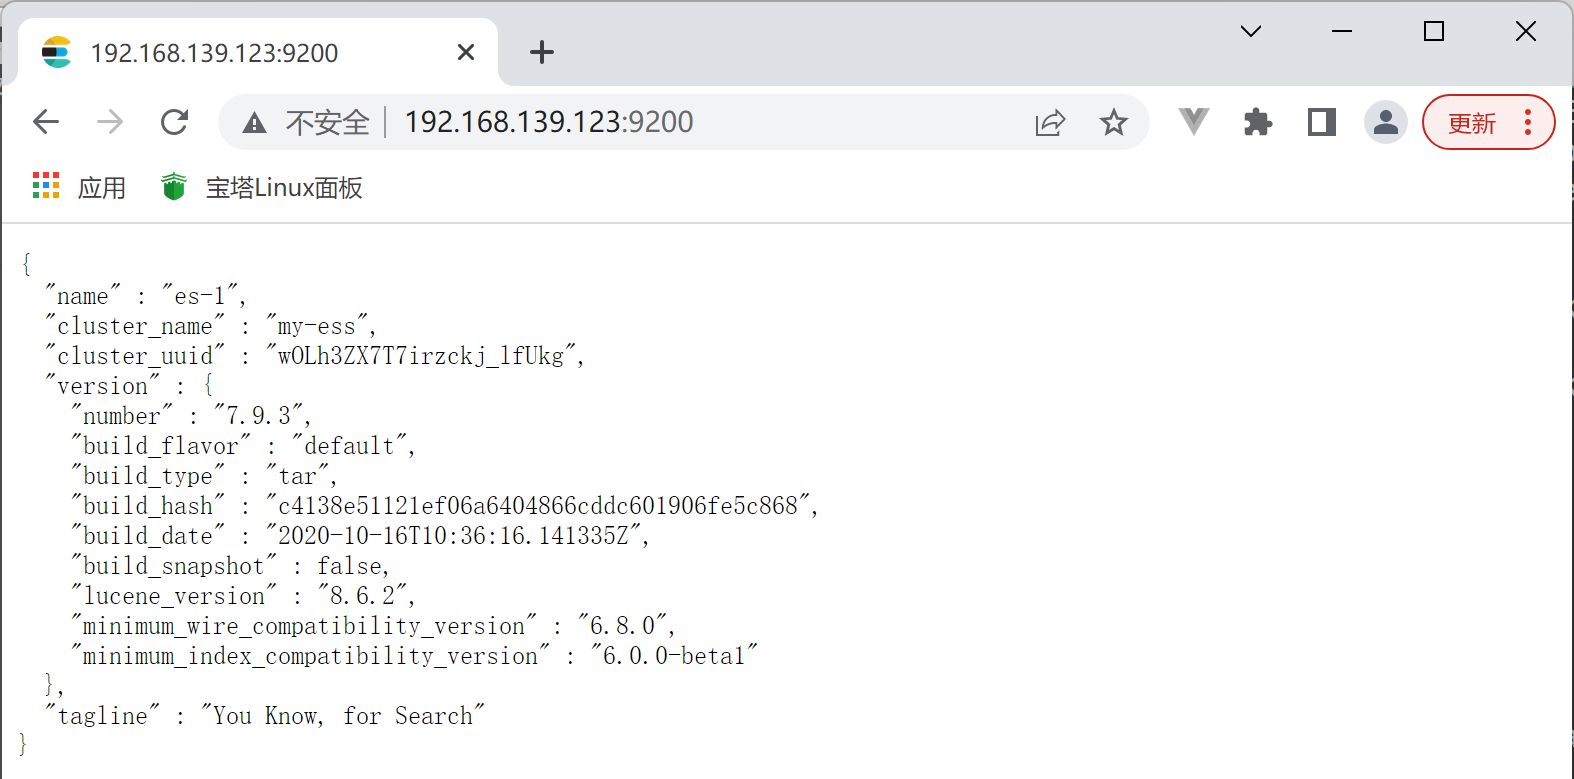
Windows 谷歌浏览器安装head-master(需要去下载ocr文件,修改 headmaster_head文件夹中 vendor.js文件中关于请求方式从form 修改为 application/json,具体修改位置见文末)插件方便查看json格式的查询结果
Windows插件安装
安装插件 谷歌浏览器设置 更多工具 扩展程序 添加插件
可以使用图形界面或者命令添加索引 格式是索引/类型 也可以在linux中使用 Curl命令来添加内容 添加使用的提交类型是POST
1
2
3
4
5
6
7
8
9
10
11
12
13
14
15
16
17
18
| curl -H "Content-Type: application/json" -XPOST 'localhost:9200/team/player/1' -d '
{
"name":"zs",
"high":"175",
"val":90
}'
curl -H "Content-Type: application/json" -XPOST 'localhost:9200/team/player/2' -d '
{
"name":"ls",
"high":"166",
"val":85
}'
curl -H "Content-Type: application/json" -XPOST 'localhost:9200/team/player/3' -d '
{
"name":"ww",
"high":"180",
"val":77
}'
|
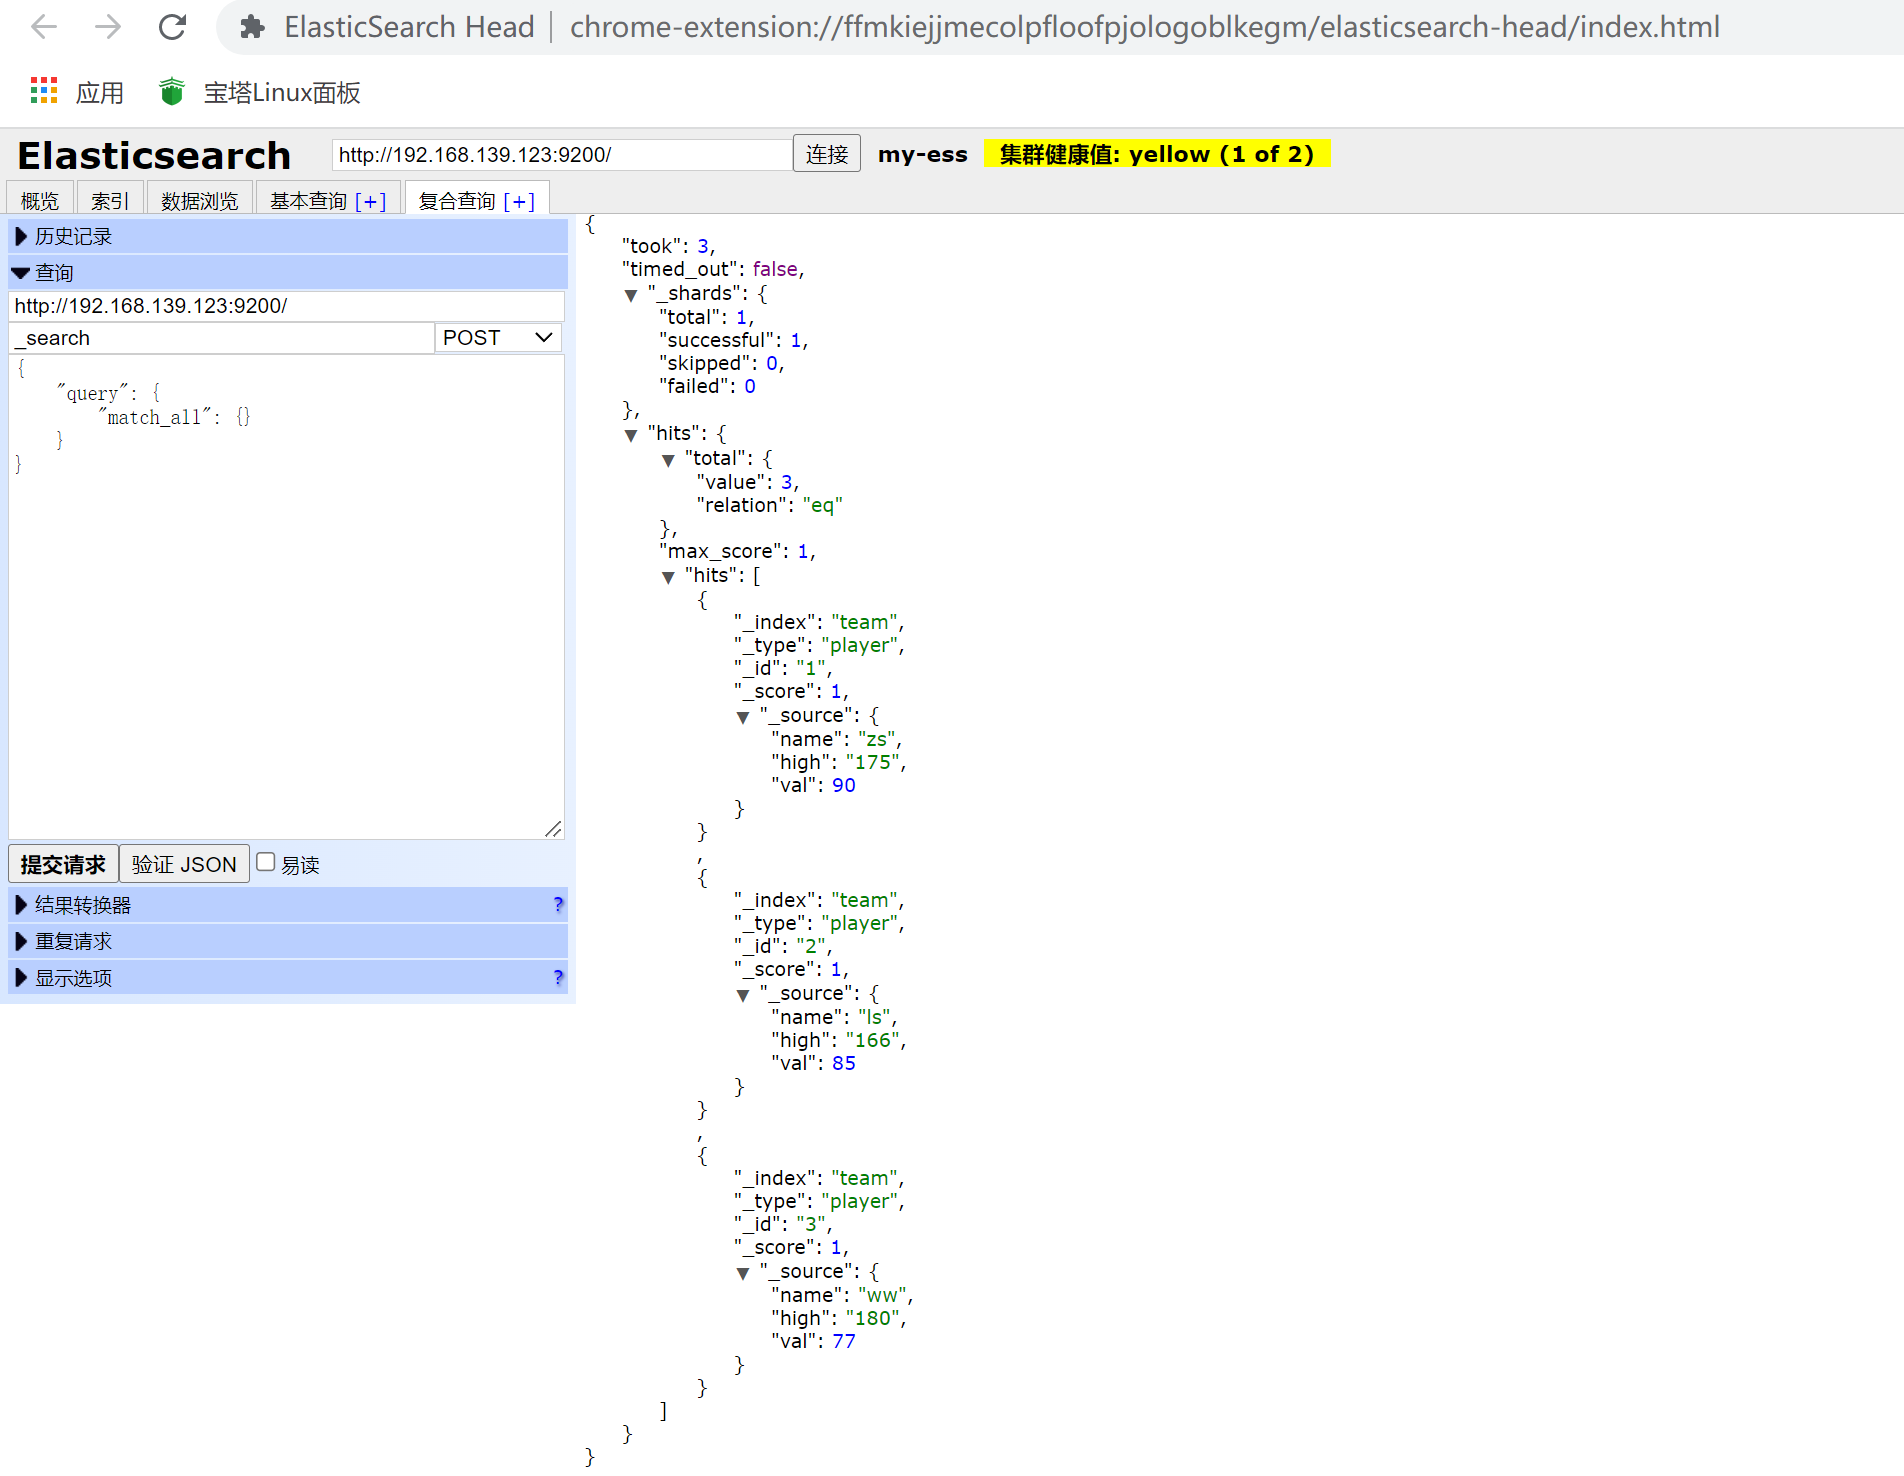
执行完上面内容 插入 一个索引为球队 类型为球员的 三条数据
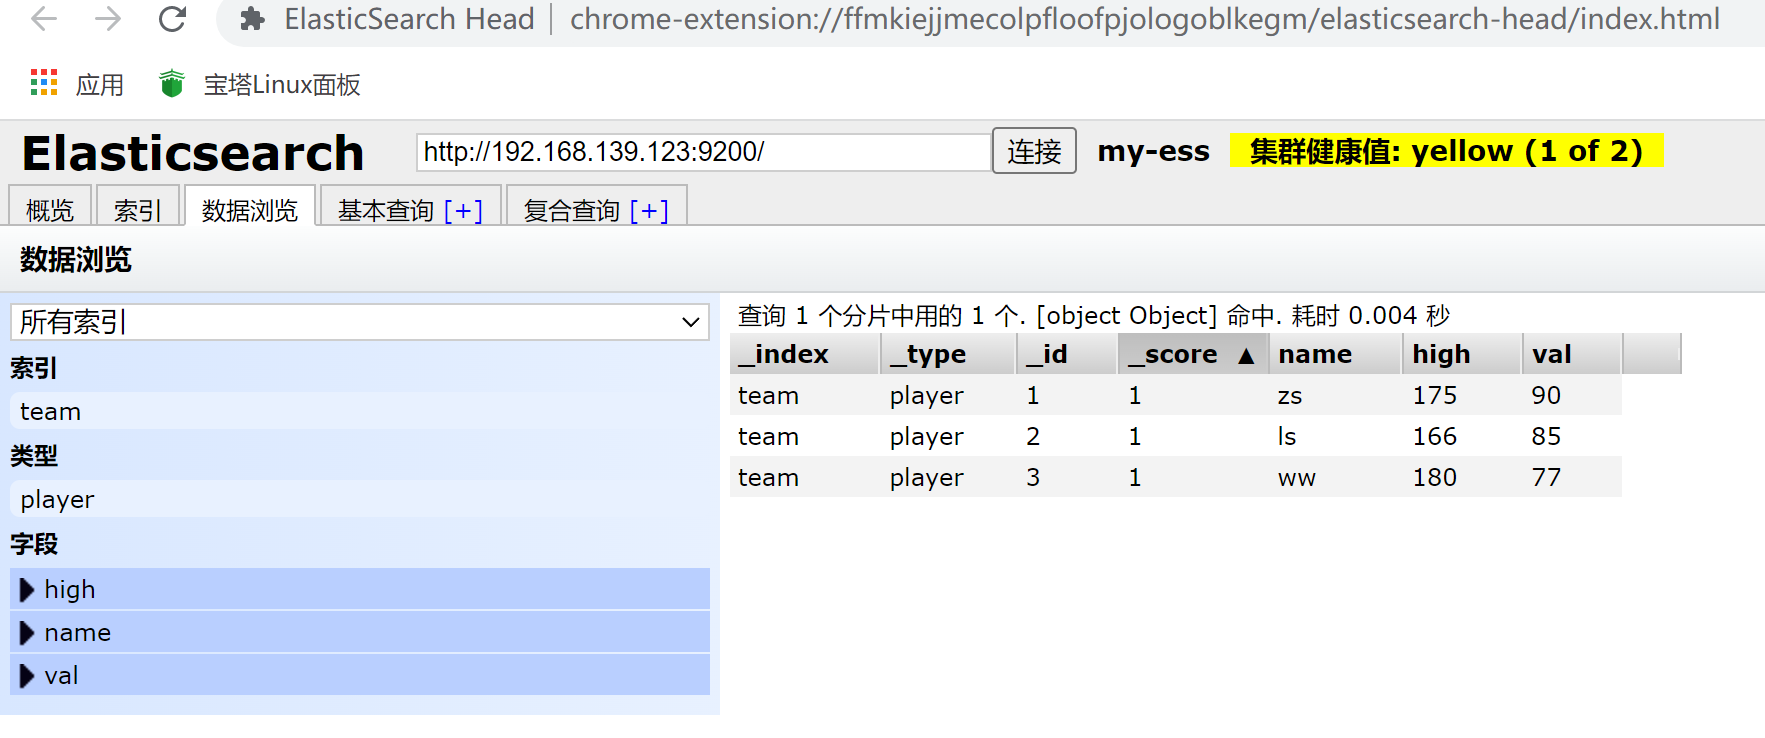
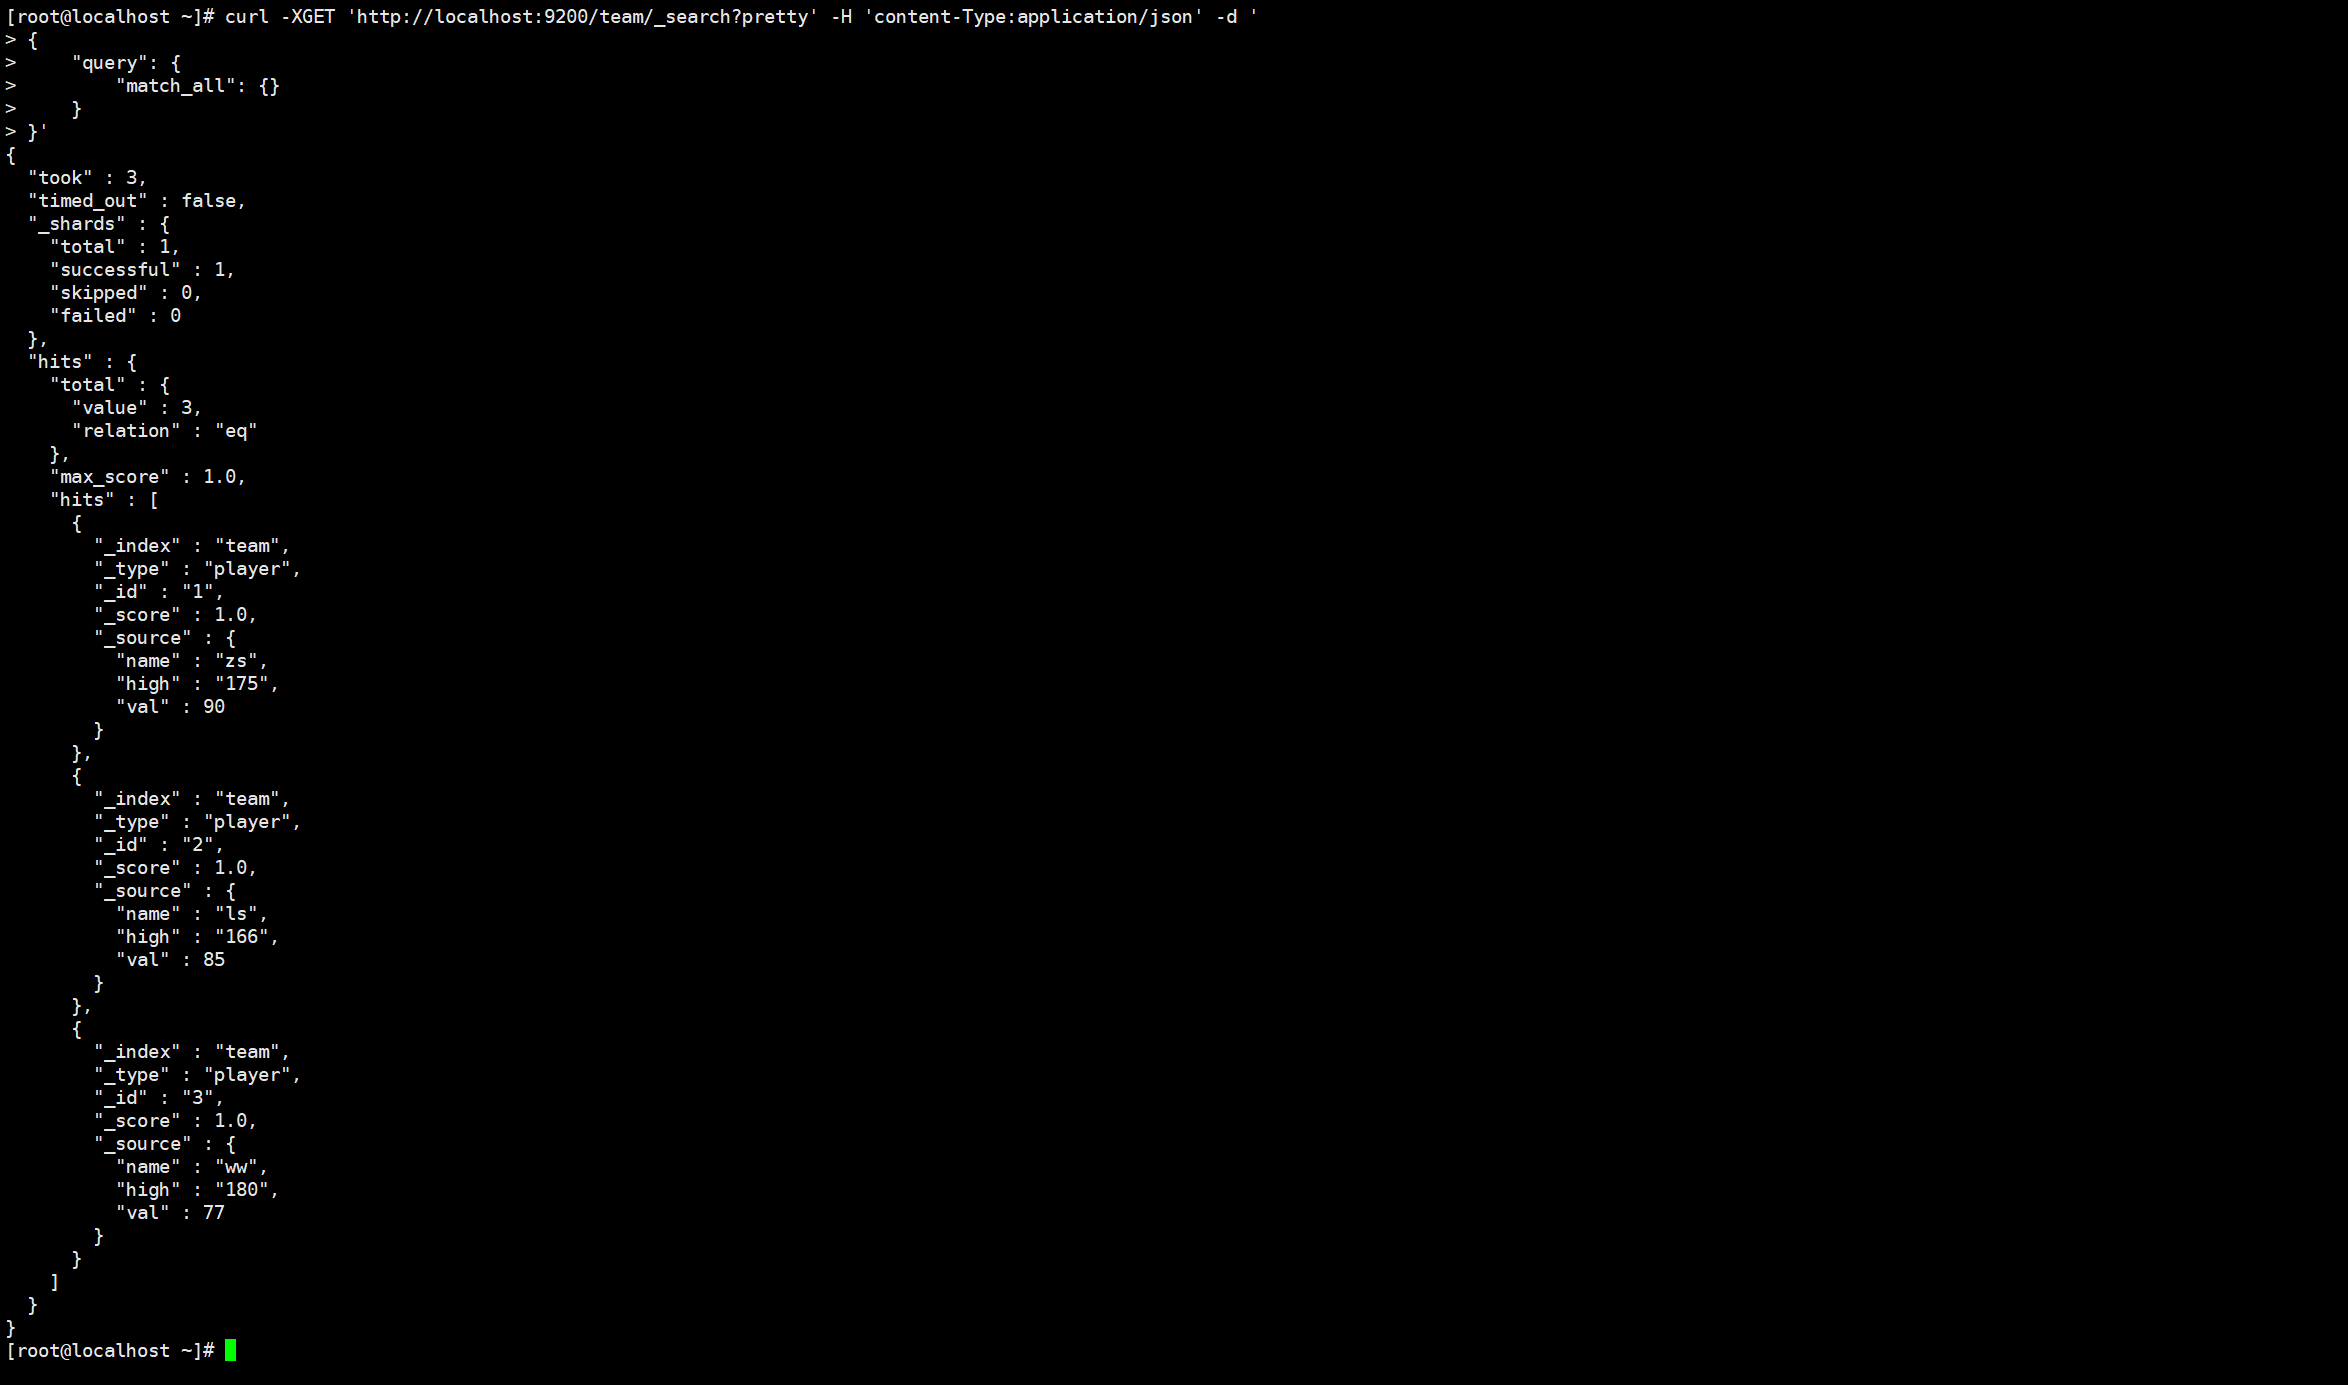
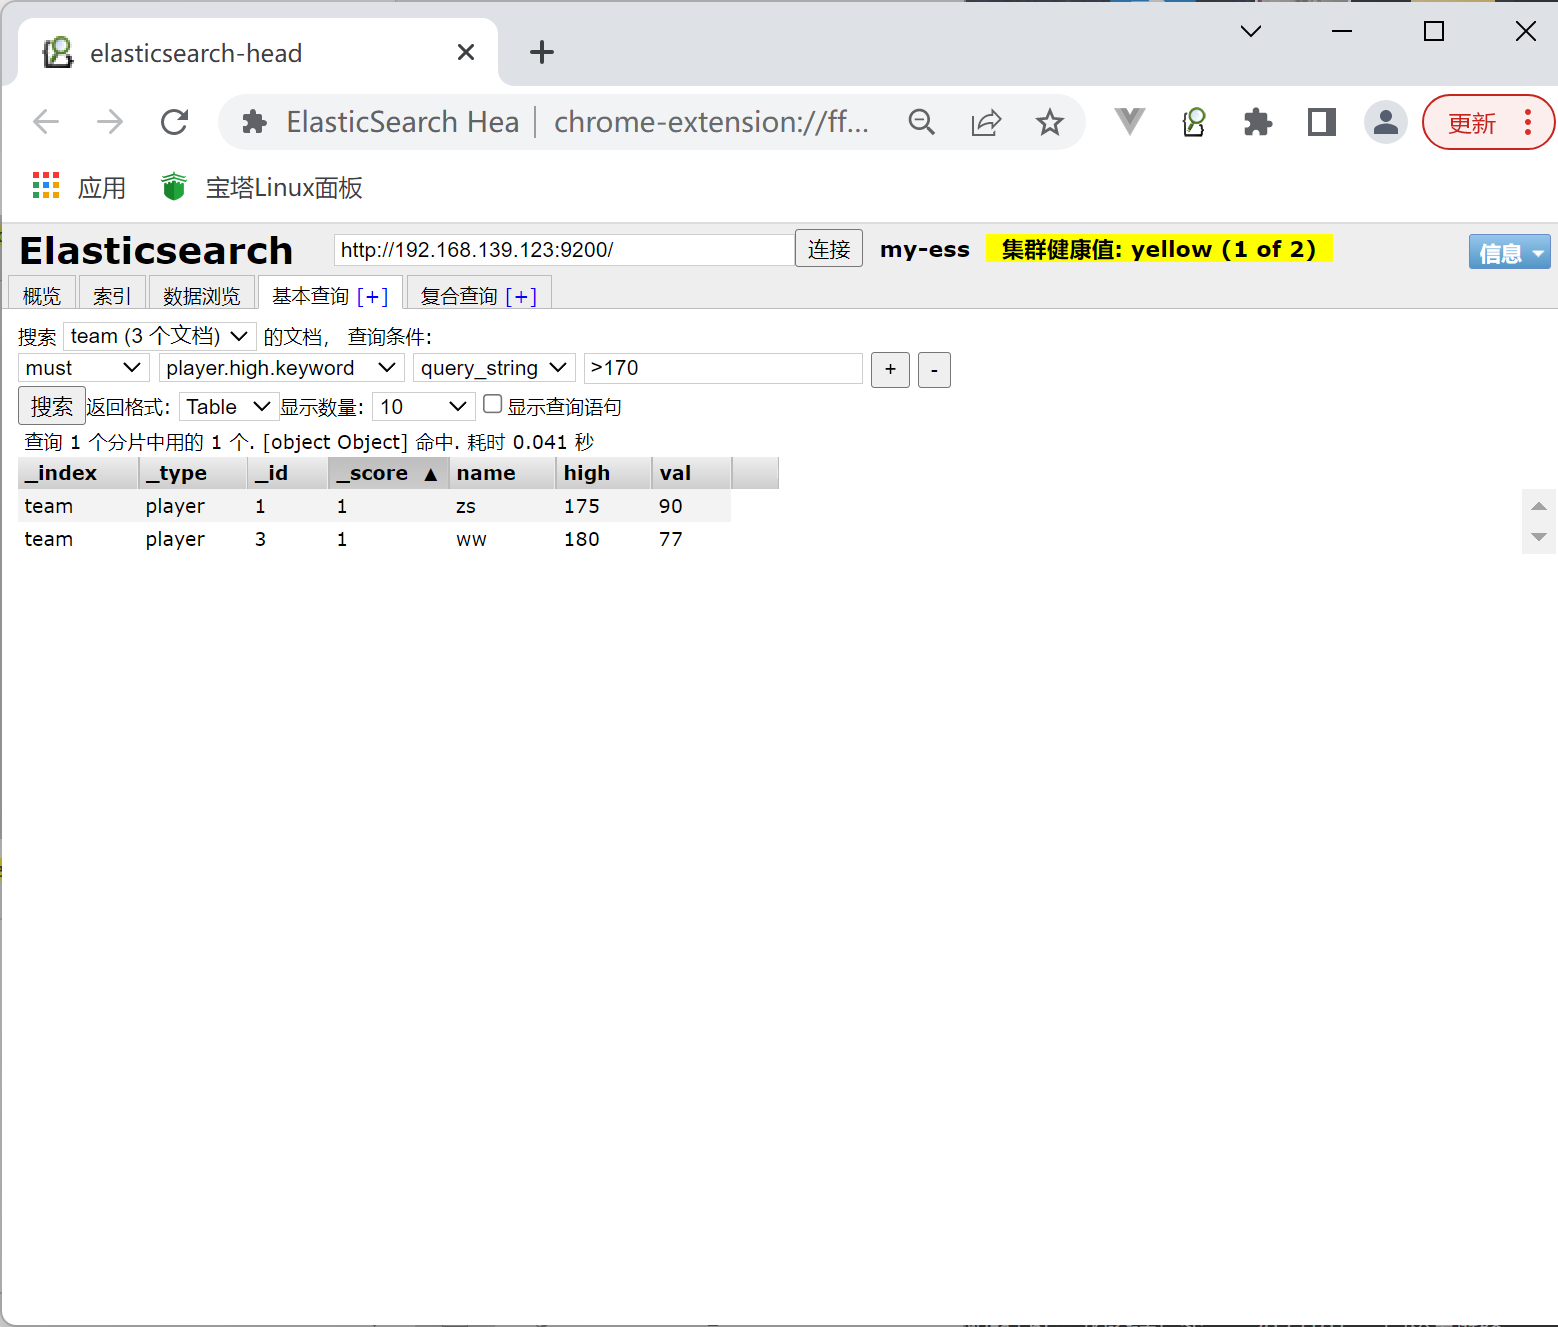
查看可以使用图形界面也可以使用命令
1
2
3
4
5
6
| curl -XGET 'http://localhost:9200/team/_search?pretty' -H 'content-Type:application/json' -d '
{
"query": {
"match_all": {}
}
}'
|
1
2
3
4
5
6
7
8
9
10
11
12
13
14
15
16
17
18
19
20
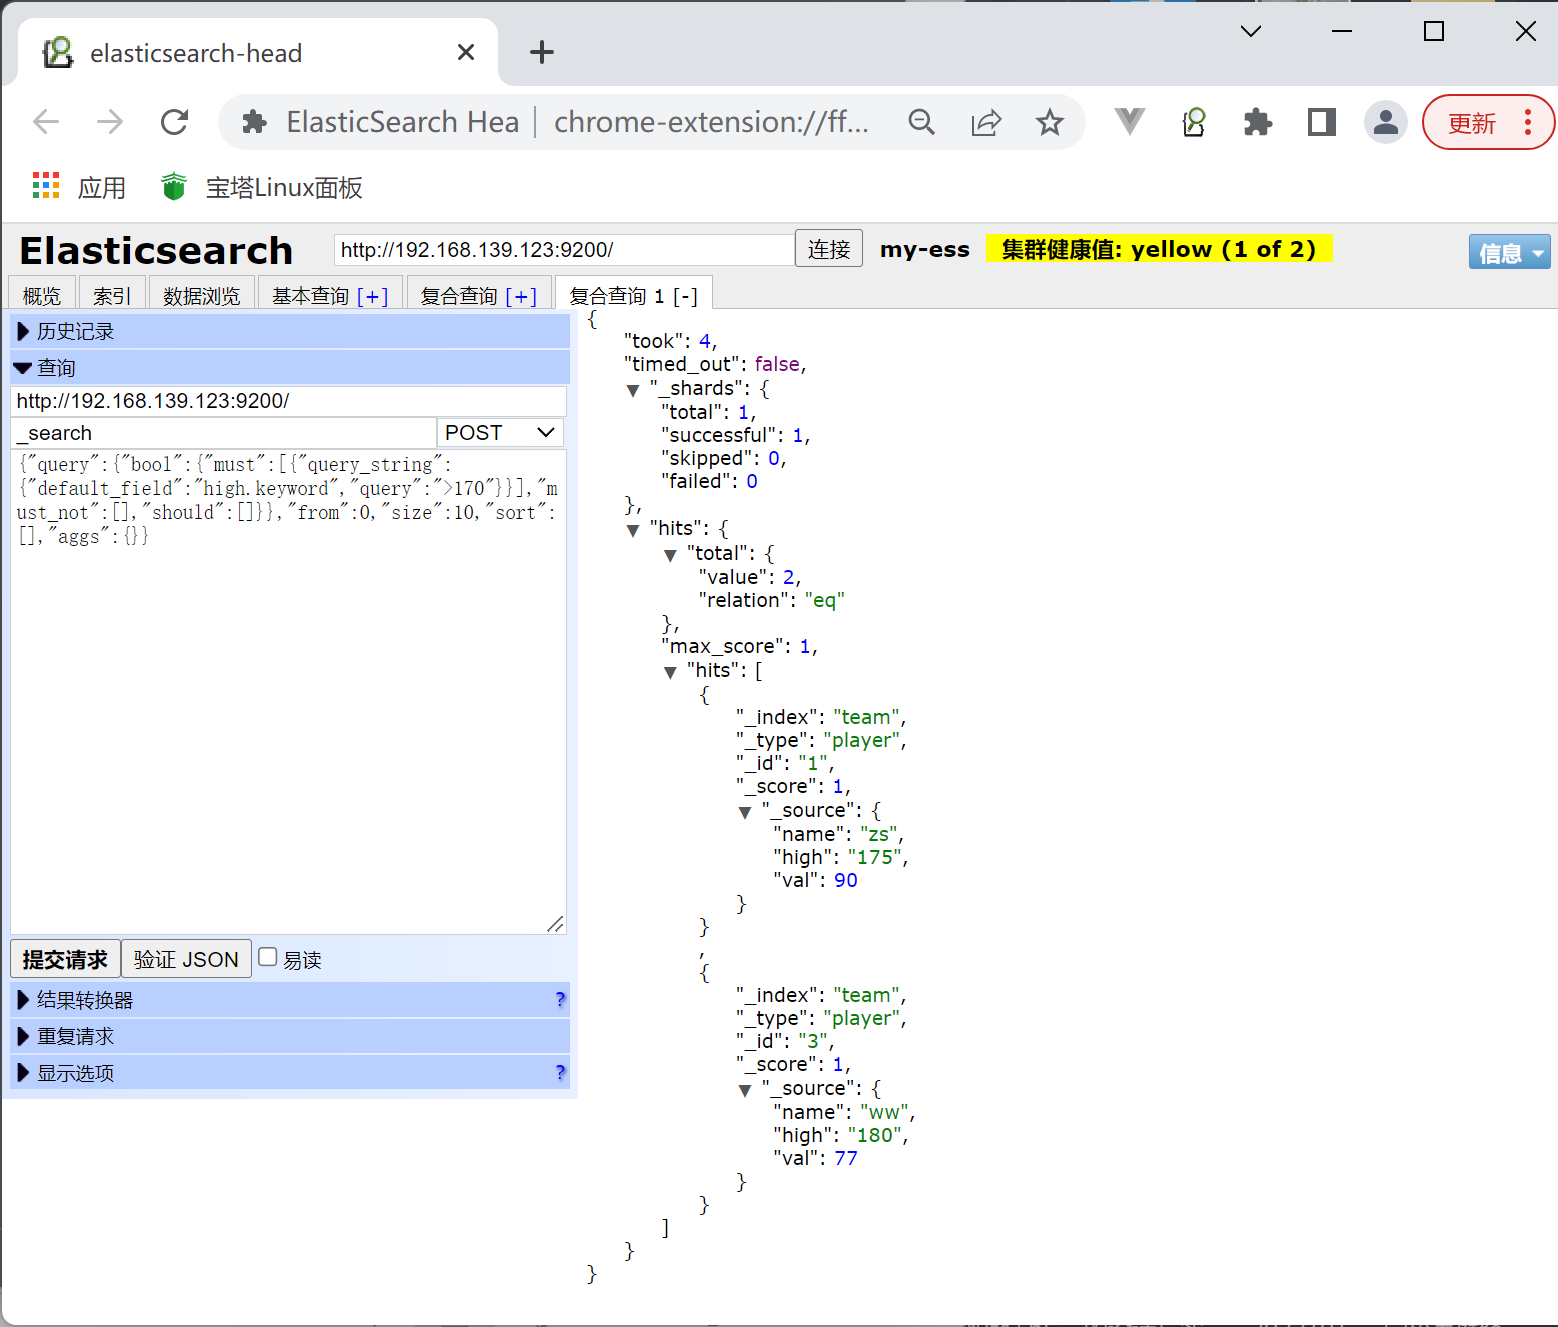
| {
"query": {
"bool": {
"must": [
{
"query_string": {
"default_field": "high.keyword",
"query": ">170"
}
}
],
"must_not": [],
"should": []
}
},
"from": 0,
"size": 10,
"sort": [],
"aggs": {}
}
|
报错
{“error”:”Content-Type header [application/x-www-form-urlencoded] is not supported”,”status”:406}
解决办法:
进入head安装目录;
编辑vendor.js 共有两处
①、6886行 contentType: “application/x-www-form-urlencoded,改成:contentType: “application/json;charset=UTF-8”
②、7574行 var inspectData = s.contentType === “application/x-www-form-urlencoded” &&,改成:var inspectData = s.contentType === “application/json;charset=UTF-8” &&
原因2:在curl中,是在报文Content-type的参数:application/x-www-form-urlencoded不支持Json发送。需要改成application/Json。所以需要添加参数 ; -H ‘Content-Type: application/json’或者直接在终端操作命令时修改操作命令
原命令:
1
2
3
4
5
6
| curl -XGET 'http:
{
"query": {
"match_all": {}
}
}'
|
修改后命令:
1
2
3
4
5
6
7
8
9
| curl -XGET 'localhost:9200/_count?pretty' -H 'content-Type:application/json' -d '
{
"query":{
"match_all":{}
}
|
或:
1
| curl -H "Content-Type: application/json" http://localhost:9200/tmdb/_search?pretty -d ' {"query": {"match_all": {}}}'
|
1
2
3
4
5
6
| curl -XGET 'http://localhost:9200/team/_search?pretty' -H 'content-Type:application/json' -d '
{
"query": {
"match_all": {}
}
}'
|