Redis主从和集群搭建

Redis复制集(主从)

原理

1
2
3
4
5
6
7
8
9
1. 副本库通过slaveof 192.168.177.200 6379命令,连接主库,并发送SYNC给主库 
2. 主库收到SYNC,会立即触发BGSAVE,后台保存RDB,发送给副本库
3. 副本库接收后会应用RDB快照
4. 主库会陆续将中间产生的新的操作,保存并发送给副本库
5. 到此,我们主复制集就正常工作了
6. 再此以后,主库只要发生新的操作,都会以命令传播的形式自动发送给副本库.
7. 所有复制相关信息,从info信息中都可以查到.即使重启任何节点,他的主从关系依然都在.
8. 如果发生主从关系断开时,从库数据没有任何损坏,在下次重连之后,从库发送PSYNC给主库
9. 主库只会将从库缺失部分的数据同步给从库应用,达到快速恢复主从的目的

数据一致性

1
2
min-slaves-to-write 1
min-slaves-max-lag 3
1
2
#建议主库开启持久化
如果不开有可能,主库重启操作,造成所有主从数据丢失!

配置

环境

192.168.177.200 版本
6380、6381、6382 3.2.12
1
2
3
4
5
6
7
8
9
10
11
12
13
14
15
16
17
18
19
20
21
22
23
24
25
26
27
28
29
30
31
32
33
34
35
36
37
38
39
40
41
42
43
44
45
46
47
48
49
50
51
52
53
#创建文件夹
mkdir -p /web/soft/redis/638{0..2}

#配置
cat >> /web/soft/redis/6380/redis.conf <<EOF
port 6380
daemonize yes
pidfile /web/soft/redis/6380/redis.pid
loglevel notice
logfile "/web/soft/redis/6380/redis.log"
dbfilename dump.rdb
dir /web/soft/redis/6380
requirepass 123456
masterauth 123456
EOF


cat >> /web/soft/redis/6381/redis.conf <<EOF
port 6381
daemonize yes
pidfile /web/soft/redis/6381/redis.pid
loglevel notice
logfile "/web/soft/redis/6381/redis.log"
dbfilename dump.rdb
dir /web/soft/redis/6381
requirepass 123456
masterauth 123456
EOF


cat >> /web/soft/redis/6382/redis.conf <<EOF
port 6382
daemonize yes
pidfile /web/soft/redis/6382/redis.pid
loglevel notice
logfile "/web/soft/redis/6382/redis.log"
dbfilename dump.rdb
dir /web/soft/redis/6382
requirepass 123456
masterauth 123456
EOF

#启动
redis-server /web/soft/redis/6380/redis.conf
redis-server /web/soft/redis/6381/redis.conf
redis-server /web/soft/redis/6382/redis.conf

#主节点:6380
#从节点:6381、6382
#开启主从:
6381/6382命令行:
redis-cli -p 6381 -a 123456 SLAVEOF 192.168.177.200 6380
redis-cli -p 6382 -a 123456 SLAVEOF 192.168.177.200 6380

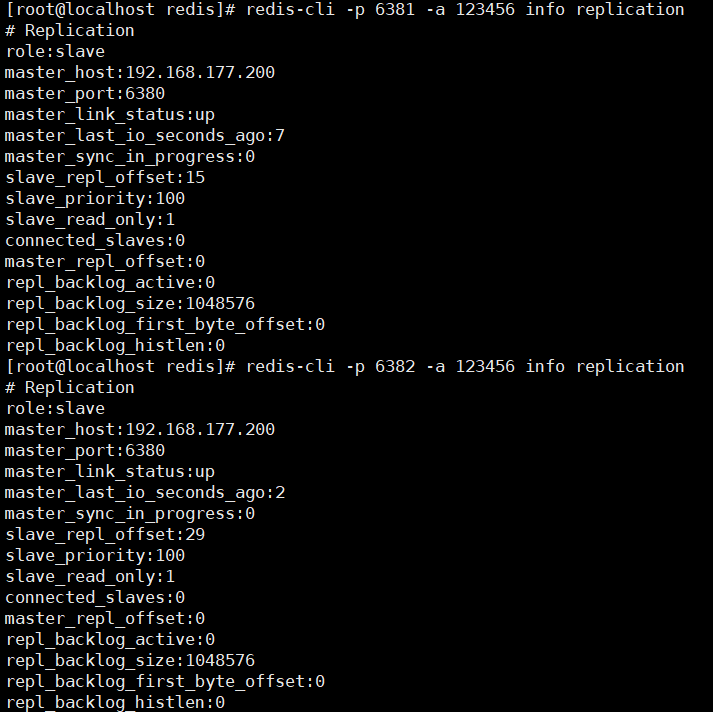
验证

1
2
3
4
#查询主从状态
redis-cli -p 6380 -a 123456 info replication
redis-cli -p 6381 -a 123456 info replication
redis-cli -p 6382 -a 123456 info replication

Redis-sentinel(哨兵)

配置

1
2
3
4
5
6
7
8
9
10
11
12
13
14
15
16
17
18
19
20
21
22
23
24
25
1、监控
2、自动选主,切换(6381 slaveof no one)
3、2号从库(6382)指向新主库(6381)
4、应用透明
5、自动处理故障节点

mkdir /web/soft/redis/26380
cd /web/soft/redis/26380
vim sentinel.conf
port 26380
dir "/web/soft/redis/26380"
sentinel monitor mymaster 127.0.0.1 6380 1
sentinel down-after-milliseconds mymaster 5000
sentinel auth-pass mymaster 123456

#启动:
redis-sentinel /web/soft/redis/26380/sentinel.conf &>/web/soft/redis/26380/sentinel.log &

==============================
如果有问题:
1、重新准备1主2从环境
2、kill掉sentinel进程
3、删除sentinel目录下的所有文件
4、重新搭建sentinel
======================================

验证

1
2
3
4
5
6
7
8
9
10
11
12
13
14
15
16
17
#停主库测试:

redis-cli -a 123456 -p 6380 shutdown
redis-cli -a 123456 -p 6381 info replication

#启动源主库(6380),看状态。
redis-server /web/soft/redis/6380/redis.conf

Sentinel管理命令:
redis-cli -p 26380
PING :返回 PONG 。
SENTINEL masters :列出所有被监视的主服务器
SENTINEL slaves <master name>

SENTINEL get-master-addr-by-name <master name> : 返回给定名字的主服务器的 IP 地址和端口号。
SENTINEL reset <pattern> : 重置所有名字和给定模式 pattern 相匹配的主服务器。
SENTINEL failover <master name> : 当主服务器失效时, 在不询问其他 Sentinel 意见的情况下, 强制开始一次自动故障迁移。

Redis-Cluster

介绍

高性能

1
2
3
4
1、在多分片节点中,将16384个槽位,均匀分布到多个分片节点中
2、存数据时,将key做crc16(key),然后和16384进行取模,得出槽位值(0-16383之间)
3、根据计算得出的槽位值,找到相对应的分片节点的主节点,存储到相应槽位上
4、如果客户端当时连接的节点不是将来要存储的分片节点,分片集群会将客户端连接切换至真正存储节点进行数据存储

高可用

1
2
3
4
5
搭建集群时,会为每一个分片的主节点,对应一个从节点,实现slaveof的功能,同时当主节点down,实现类似于sentinel的自动failover的功能.
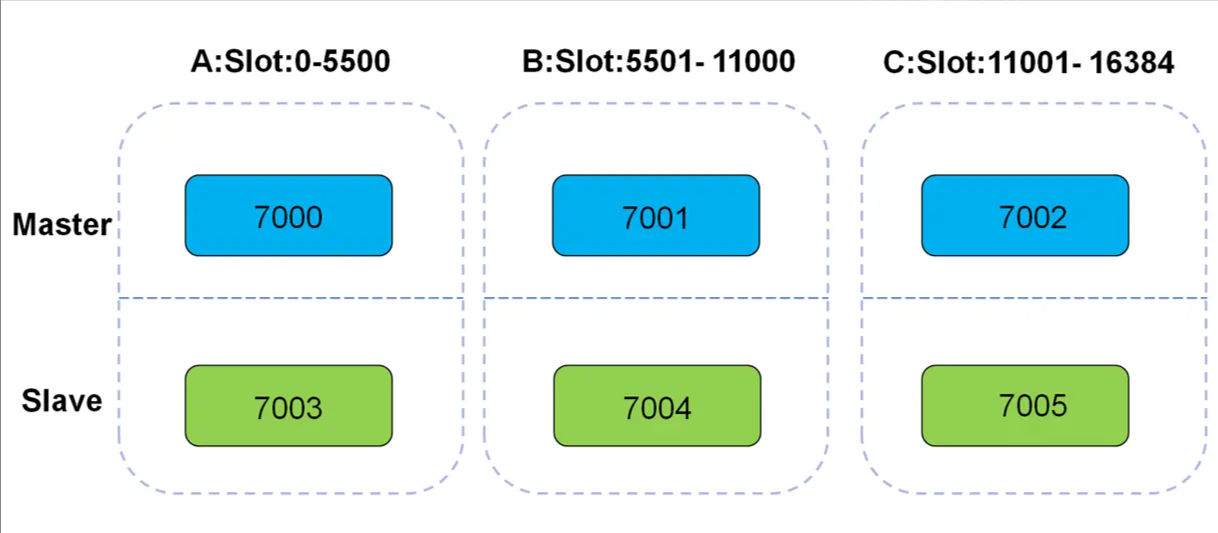
1、redis会有多组分片构成(3组)
2、redis cluster 使用固定个数的slot存储数据(一共16384slot)
3、每组分片分得1/3 slot个数(0-5500 5501-11000 11001-16383)
4、基于CRC16(key) % 16384 ====>值 (槽位号)。

环境

此处已重置redis环境

192.168.177.200 192.168.177.201 192.168.177.202
6380 6381 6380 6381 6380 6381
1
2
6个redis实例,一般会放到3台硬件服务器 端口号:6380-6381
#注:在企业规划中,一个分片的两个分到不同的物理机,防止硬件主机宕机造成的整个分片数据丢失。

安装

安装插件

1
2
3
4
5
6
7
8
EPEL源安装ruby支持
yum install ruby rubygems -y
使用国内源
gem sources -l
gem sources -a http://mirrors.aliyun.com/rubygems/
gem sources --remove https://rubygems.org/
gem sources -l
gem install redis -v 3.3.3

集群节点搭建

1
2
3
4
5
6
7
8
9
10
11
12
13
14
15
16
17
18
19
20
21
22
23
24
25
26
27
28
29
30
31
32
33
34
35
36
37
38
39
40
41
42
43
44
45
46
47
48
49
50
51
52
53
54
55
56
57
58
59
60
61
62
63
64
65
66
67
68
69
70
71
72
73
74
75
76
77
78
79
80
81
82
83
84
85
86
87
88
89
90
91
92
93
94
95
96
97
98
99
100
101
102
103
104
105
106
107
108
109
#200
mkdir /web/soft/redis/6380
mkdir /web/soft/redis/6381

cat > /web/soft/redis/6380/redis.conf <<EOF
#bind 192.168.177.200
port 6380
daemonize yes
pidfile /web/soft/redis/6380/redis.pid
loglevel notice
logfile "/web/soft/redis/6380/redis.log"
dbfilename dump.rdb
dir /web/soft/redis/6380
protected-mode no
cluster-enabled yes
cluster-config-file nodes.conf
cluster-node-timeout 5000
appendonly yes
EOF

cat > /web/soft/redis/6381/redis.conf <<EOF
#bind 192.168.177.200
port 6381
daemonize yes
pidfile /web/soft/redis/6381/redis.pid
loglevel notice
logfile "/web/soft/redis/6381/redis.log"
dbfilename dump.rdb
dir /web/soft/redis/6381
protected-mode no
cluster-enabled yes
cluster-config-file nodes.conf
cluster-node-timeout 5000
appendonly yes
EOF


#201
mkdir /web/soft/redis/6380
mkdir /web/soft/redis/6381

cat > /web/soft/redis/6380/redis.conf <<EOF
#bind 192.168.177.201
port 6380
daemonize yes
pidfile /web/soft/redis/6380/redis.pid
loglevel notice
logfile "/web/soft/redis/6380/redis.log"
dbfilename dump.rdb
dir /web/soft/redis/6380
protected-mode no
cluster-enabled yes
cluster-config-file nodes.conf
cluster-node-timeout 5000
appendonly yes
EOF

cat > /web/soft/redis/6381/redis.conf <<EOF
#bind 192.168.177.201
port 6381
daemonize yes
pidfile /web/soft/redis/6381/redis.pid
loglevel notice
logfile "/web/soft/redis/6381/redis.log"
dbfilename dump.rdb
dir /web/soft/redis/6381
protected-mode no
cluster-enabled yes
cluster-config-file nodes.conf
cluster-node-timeout 5000
appendonly yes
EOF


#202
mkdir /web/soft/redis/6380
mkdir /web/soft/redis/6381

cat > /web/soft/redis/6380/redis.conf <<EOF
#bind 192.168.177.202
port 6380
daemonize yes
pidfile /web/soft/redis/6380/redis.pid
loglevel notice
logfile "/web/soft/redis/6380/redis.log"
dbfilename dump.rdb
dir /web/soft/redis/6380
protected-mode no
cluster-enabled yes
cluster-config-file nodes.conf
cluster-node-timeout 5000
appendonly yes
EOF

cat > /web/soft/redis/6381/redis.conf <<EOF
#bind 192.168.177.202
port 6381
daemonize yes
pidfile /web/soft/redis/6381/redis.pid
loglevel notice
logfile "/web/soft/redis/6381/redis.log"
dbfilename dump.rdb
dir /web/soft/redis/6381
protected-mode no
cluster-enabled yes
cluster-config-file nodes.conf
cluster-node-timeout 5000
appendonly yes
EOF

启动节点

1
2
3
4
5
6
7
8
9
#200
redis-server /web/soft/redis/6380/redis.conf
redis-server /web/soft/redis/6381/redis.conf
#201
redis-server /web/soft/redis/6380/redis.conf
redis-server /web/soft/redis/6381/redis.conf
#202
redis-server /web/soft/redis/6380/redis.conf
redis-server /web/soft/redis/6381/redis.conf

查看

1
ps -ef|grep redis

网络设置

1
2
3
4
5
6
7
8
9
10
11
12
#200
route add -host 192.168.177.201 gw 192.168.177.2
route add -host 192.168.177.202 gw 192.168.177.2
#201
route add -host 192.168.177.200 gw 192.168.177.2
route add -host 192.168.177.202 gw 192.168.177.2
#202
route add -host 192.168.177.200 gw 192.168.177.2
route add -host 192.168.177.201 gw 192.168.177.2

firewall-cmd --permanent --add-port=6380-6381/tcp && firewall-cmd --reload
firewall-cmd --permanent --zone=public --add-port=16380-16381/tcp && firewall-cmd --reload

节点加入管理

1
2
3
4
5
#200
redis-trib.rb create --replicas 1 192.168.177.200:6380 192.168.177.201:6380 192.168.177.202:6380 192.168.177.201:6381 192.168.177.202:6381 192.168.177.200:6381
yes
#5以上版本
redis-cli -a 123456 --cluster-replicas 1 --cluster create

集群状态查看

1
2
3
4
#集群主节点状态
redis-cli -a 123456 -h 192.168.177.200 -p 6380 cluster nodes | grep master
#集群从节点状态
redis-cli -a 123456 -h 192.168.177.200 -p 6380 cluster nodes | grep slave

节点管理

增加新节点

1
2
3
4
5
6
7
8
9
10
11
12
13
14
15
16
17
18
19
20
21
22
23
24
25
26
27
28
29
30
31
32
33
34
35
36
37
38
39
40
41
42
#200
mkdir /web/soft/redis/6382

cat > /web/soft/redis/6382/redis.conf <<EOF
#bind 192.168.177.200
port 6382
daemonize yes
pidfile /web/soft/redis/6382/redis.pid
loglevel notice
logfile "/web/soft/redis/6382/redis.log"
dbfilename dump.rdb
dir /web/soft/redis/6382
protected-mode no
cluster-enabled yes
cluster-config-file nodes.conf
cluster-node-timeout 5000
appendonly yes
EOF


#201
mkdir /web/soft/redis/6382

cat > /web/soft/redis/6382/redis.conf <<EOF
#bind 192.168.177.201
port 6382
daemonize yes
pidfile /web/soft/redis/6382/redis.pid
loglevel notice
logfile "/web/soft/redis/6382/redis.log"
dbfilename dump.rdb
dir /web/soft/redis/6382
protected-mode no
cluster-enabled yes
cluster-config-file nodes.conf
cluster-node-timeout 5000
appendonly yes
EOF

#启动
redis-server /web/soft/redis/6382/redis.conf
ps -ef|grep redis
添加主节点
1
2
#200
redis-trib.rb add-node 192.168.177.200:6382 192.168.177.200:6380
重新分配slot
1
2
3
4
5
6
7
8
#200
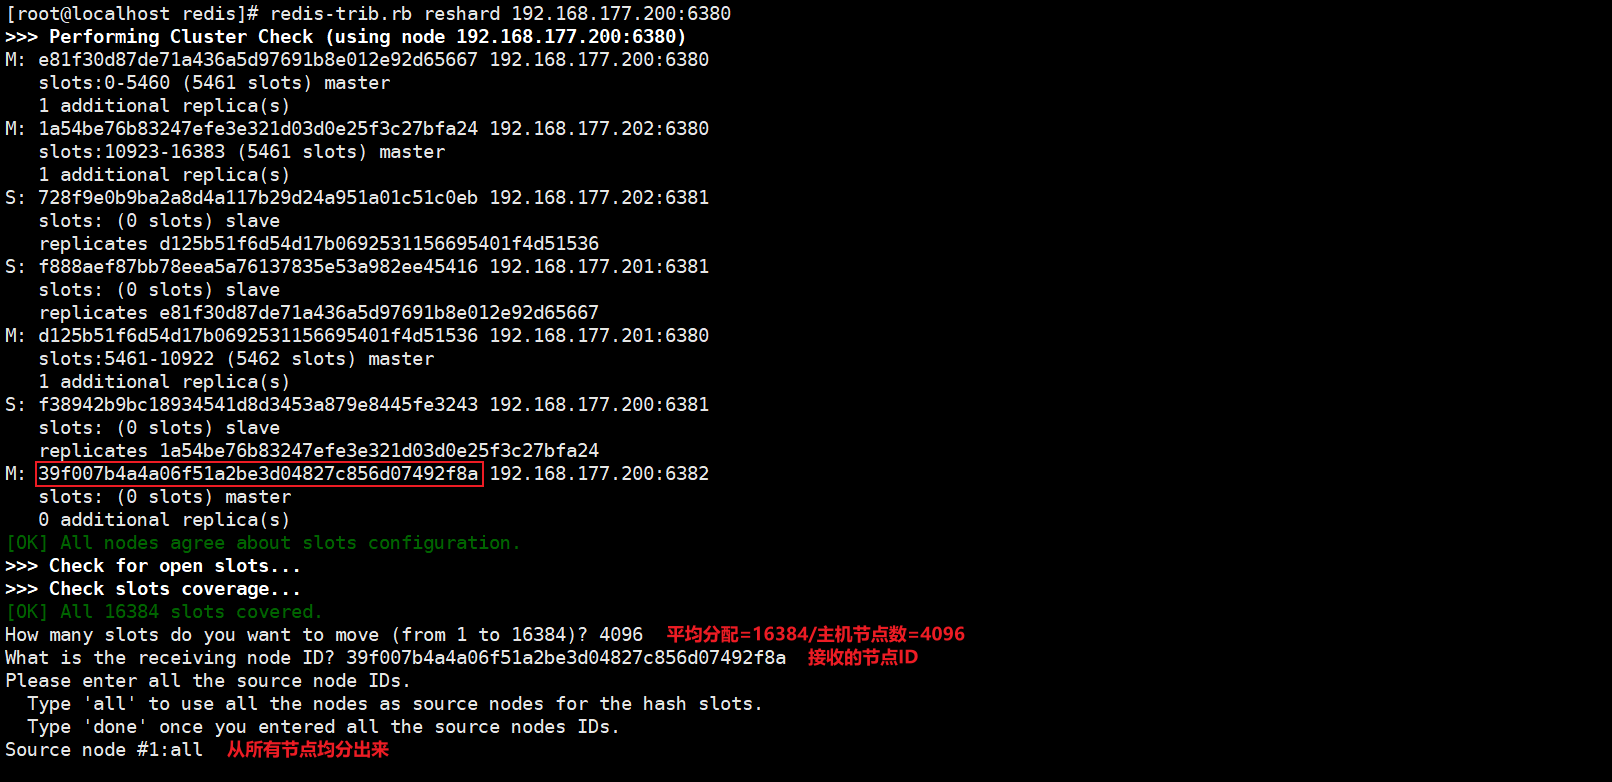
redis-trib.rb reshard 192.168.177.200:6380
#总槽位/主节点数=16384/4=4096
How many slots do you want to move (from 1 to 16384)? 4096
#接受节点ID :新的主节点ID
What is the receiving node ID?
all
yes

添加从节点
1
2
#添加从节点 指定从节点ID
redis-trib.rb add-node --slave --master-id 39f007b4a4a06f51a2be3d04827c856d07492f8a 192.168.177.201:6382 192.168.177.200:6380

删除节点

移除槽点

1
2
3
4
5
6
7
8
9
10
#将需要删除节点slot移动走
redis-trib.rb reshard 192.168.177.200:6380
#移走刚添加的主节点6382
39f007b4a4a06f51a2be3d04827c856d07492f8a 192.168.177.200:6382 master - 0 1730790994377 7 connected 0-1364 5461-6826 10923-12287
#分三次移
0-1364 5461-6826 10923-12287
1365 1366 1365
#分别还给200:6380、201:6380\202:6380
done
yes

查看

1
redis-cli -a 123456 -h 192.168.177.200 -p 6380 cluster nodes | grep slave

删除节点

1
2
redis-trib.rb del-node 192.168.177.201:6382 334daf4a5503e3b5ab5ffc8455b02d2b7f2ae16b
edis-trib.rb del-node 192.168.177.200:6382 39f007b4a4a06f51a2be3d04827c856d07492f8a

Redis多API支持

1
2
3
4
5
6
7
8
9
10
11
12
13
14
15
16
17
18
19
20
21
#python
yum install -y python36
python3 -V
yum install -y python36-pip
pip3 install redis
pip3 install redis-py-cluster


#源码方式
https://redis.io/clients
下载redis-py-master.zip
安装驱动:
unzip redis-py-master.zip
cd redis-py-master
python3 setup.py install

redis cluster的连接并操作(python2.7.2以上版本才支持redis cluster,我们选择的是3.6)
https://github.com/Grokzen/redis-py-cluster
安装redis-cluser的客户端程序
cd redis-py-cluster-unstable
python3 setup.py install

redis的单实例进行连接

1
2
3
4
5
6
7
8
9
10
redis-server /web/soft/redis/6379/redis.conf

python3
>>> import redis
>>> r=redis.StrictRedis(host='192.168.177.200',port=6379,db=0,password='123456')
>>> r.set('amt','amtdb')
True
>>> r.get('amt')
b'amtdb')
>>>

sentinel集群连接并操作

1
2
3
4
5
6
7
8
9
10
11
12
13
14
15
redis-server /web/soft/redis/6380/redis.conf
redis-server /web/soft/redis/6381/redis.conf
redis-server /web/soft/redis/6382/redis.conf

redis-sentinel /web/soft/redis/26380/sentinel.conf &
--------------------------------
## 导入redis sentinel包
>>>from redis.sentinel import Sentinel
##指定sentinel的地址和端口号
>>> sentinel = Sentinel([('localhost', 26380)], socket_timeout=0.1)
##测试,获取以下主库和从库的信息
>>> sentinel.discover_master('mymaster')
('192.168.177.200', 6381)
>>> sentinel.discover_slaves('mymaster')
[('192.168.177.200', 6382), ('192.168.177.200', 6380)]

配置读写分离

1
2
3
4
5
6
7
8
9
10
#写节点
>>> master = sentinel.master_for('mymaster', socket_timeout=0.1,password="123456")
#读节点
>>> slave = sentinel.slave_for('mymaster', socket_timeout=0.1,password="123456")
#读写分离测试 key
>>> master.set('amt', '123')
True
>>> slave.get('amt')
b'123'
>>>

python连接rediscluster集群测试

1
2
3
4
5
6
7
8
9
10
11
12
使用

python3
>>> from rediscluster import RedisCluster
>>> startup_nodes = [{"host":"192.168.177.200", "port": "6380"},{"host":"192.168.177.201", "port": "6380"},{"host":"192.168.177.202", "port": "6380"}]
### Note: decode_responses must be set to True when used with python3
>>> rc = RedisCluster(startup_nodes=startup_nodes, decode_responses=True)
>>> rc.set("aaa", "111")
True
>>> rc.get("aaa")
'111'
>>>

概念

缓存穿透

1
2
3
4
5
#概念
访问一个不存在的key,缓存不起作用,请求会穿透到DB,流量大时DB会挂掉。
#解决方案
采用布隆过滤器,使用一个足够大的bitmap,用于存储可能访问的key,不存在的key直接被过滤;
访问key未在DB查询到值,也将空值写进缓存,但可以设置较短过期时间。

缓存雪崩

1
2
3
4
#概念
大量的key设置了相同的过期时间,导致在缓存在同一时刻全部失效,造成瞬时DB请求量大、压力骤增,引起雪崩。
#解决方案
可以给缓存设置过期时间时加上一个随机值时间,使得每个key的过期时间分布开来,不会集中在同一时刻失效。

缓存击穿

1
2
3
4
#概念
一个存在的key,在缓存过期的一刻,同时有大量的请求,这些请求都会击穿到DB,造成瞬时DB请求量大、压力骤增。
#解决方案
在访问key之前,采用SETNX(set if not exists)来设置另一个短期key来锁住当前key的访问,访问结束再删除该短期key。

Redis主从和集群搭建
https://yftxhy.site/2024/11/05/Redis主从和集群搭建/
作者
Taozi
发布于
2024年11月5日
许可协议